Setting up customer purchase limits in Shopify with DC order limits
Customer Purchase Limits let you track purchases per logged-in customer and enforce lifetime maximums for quantity and/or total spend across selected products or variants. Use this feature to:
- Set a quantity limit per customer — cap how many units each customer can buy (e.g., "max 2 per customer lifetime")
- Set a spending limit per customer — cap how much each customer can spend (e.g., "$500 max per customer")
- Create time-based limits — reset limits on a weekly, monthly, quarterly, or annual schedule using Shopify Flow
When to use Customer Purchase Limits:
Use this rule type when you need to track purchases across multiple orders, such as lifetime, daily, monthly, or annual limits, or when you need to limit how many times each customer can buy.
When NOT to use this:
If you simply want to allow only tagged customers to purchase without tracking quantities across orders, use a basic Order Limit with an exclusion tag instead. This is simpler and does not require purchase history tracking. See Using exclusion rules.
Looking for "once per customer" or lifetime limits? If you want to limit how many times a customer can ever buy a product (not just per order), see Setting Up Lifetime / Once-Per-Customer Limits for a step-by-step guide.
Not sure which limit type you need? See Which Limit Type Should I Use? for a quick comparison of Order Limits vs Customer Purchase Limits.
Using tags to restrict who can purchase? Customer tags only work for logged-in customers — the app can't check a tag until it knows who the customer is. If you're setting up a rule like "only VIP-tagged customers can buy," enable Guest Handling → Block and require login. This prompts guests to log in before the app checks their tag eligibility. One rule in Customer Purchase Limits handles all three states: guests (blocked until login), logged-in without tag (blocked), and logged-in with tag (can purchase).
Time-based limits: Lifetime vs Yearly
DC Order Limits tracks customer purchases as lifetime limits by default. This means once a customer reaches their limit, they cannot purchase more unless you manually reset their count.
Need yearly limits instead of lifetime?
If you want limits that reset annually (e.g., "each customer can buy 5 per year"), you have two options:
- Manual yearly reset — Reset all customer counts at the start of each year using the "Reset All" button in the usage history page
- Automated reset with Shopify Flow — Set up a scheduled Flow that triggers the reset automatically. See Resetting Customer Purchase Limits with Shopify Flow for setup instructions.
Important: No rollover of unused amounts
When you reset limits (whether manually or via automation), all customer counts reset to zero. Unused purchase allowances do not roll over to the next period. For example, if a customer only bought 2 of their allowed 5 items, after reset they start fresh at 0 used — the 3 unused items are not added to their new allowance.
When to use the customer purchase limits
Use this feature if you want to:
- Run limited releases and prevent resellers by capping each customer's lifetime purchases of specific items.
- Gate special access for certain customers by applying limits only to customer tags or approved emails and domains.
- Control long-term inventory allocation by limiting how much any one customer can buy across a product set over time.
Setting up customer purchase limits
To set up customer purchase limits, follow these steps:
1. Access the form
- Go to the Order Limits page.
- Click on "Create rule" and select Customer Purchase Limits.
- Or, click on the title of an existing customer purchase limit rule (e.g., "Customer limit on John Doe") to edit, which will open the form.

2. Fill out Rule Details
Rule information
- Title: Enter a descriptive name for the rule. This title is used internally to identify the rule.
Purchase Limits
- Maximum Quantity: Specify the maximum number of items a customer can purchase for a lifetime.
- Maximum Spending: Specify a maximum spending limit on a customer for their lifetime.

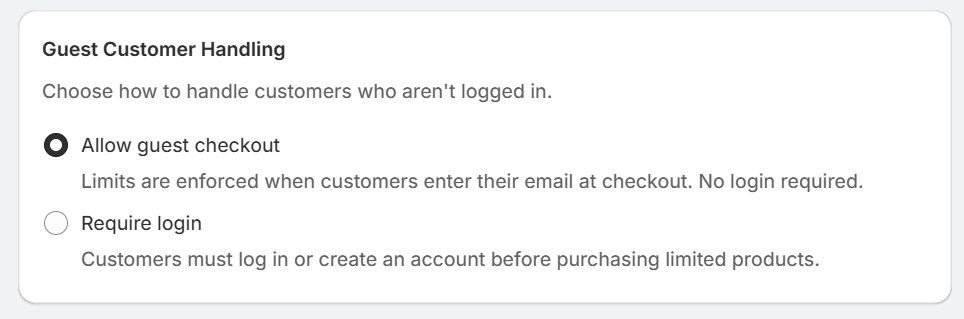
3. Guest customers handling
Purchase limits require identifying individual customers across orders so the app can check their purchase history. When a customer is logged in, this works seamlessly — the app knows who they are from the moment they land on the store.
What about non-logged-in customers? When a customer isn't logged in but enters their email address at checkout, the app can look up their customer record at that point and check their purchase history. However, this means the limit only kicks in at checkout — the customer can browse your store, add restricted products to their cart, and only get blocked when they enter their email. This creates a frustrating experience and is why we recommend requiring a login for most use cases.
You need to decide how to handle customers who aren't logged in:
- Allow guest checkout: Limits are enforced when customers enter their email at checkout. No login required.
- Pros:
- No friction for casual shoppers
- Higher conversion rates
- Works well for most e-commerce scenarios
- Cons:
- Determined resellers can check out as guests repeatedly
- Limits only apply to customers who bother to log in
- Pros:
Best for: General purchase limits where occasional bypasses are acceptable
- Require login: Customers must log in or create an account before purchasing limited products.
- Pros:
- All customers are tracked—no bypasses
- Creates account relationships for future marketing
- Essential for high-value limited drops
- Cons:
- Adds friction to checkout
- May reduce conversion rates
- Requires customers to create/remember accounts
- Pros:
Best for: High-demand product drops, preventing resellers, employee or B2B programs
Recommendation: For limited-edition releases or anti-reseller protection, choose "Block and require login." For general inventory management, "Allow purchases without limits" typically provides a better customer experience.
⚠️ Bypass risk: Because lifetime tracking is tied to customer identity (account/email), a shopper can evade limits by using a different email address or checking out as a guest. "Block and require login" is the strongest defence — it forces every purchase through an account, making it much harder to circumvent.
4. Usage tracking and resetting purchase limits
Purchases are tracked against these limits. Tracking details appear after saving. You can reset customer limits from the usage history page.
| Reset Frequency | Use Case |
| Weekly | Weekly purchase allowances (e.g., "2 per customer per week") |
| Monthly | Monthly allocation programs, subscription box add-ons |
| Quarterly/Annually | Employee discount programs, loyalty tier benefit |
| After each drop | Limited releases, flash sales, restocks |
| As needed | One-time promotions, inventory management |
How to Reset
- Go to your purchase limit rule
- Click View usage history in the Usage Tracking section
- Click Reset All
- Confirm the reset
What Happens When You Reset
- All customers tracked under this rule have their counts cleared to zero
- The "Times Reset" counter increments by one
- Customers can immediately purchase again up to the limit
- Historical data is not preserved (this cannot be undone)
Times Reset Counter
The "Times Reset" number indicates the number of times you've reset this rule. This is useful for:
- Tracking how many periods have passed (e.g., "we've done 12 weekly resets")
- Auditing when the limits were last cleared
- Verifying your reset schedule is being followed


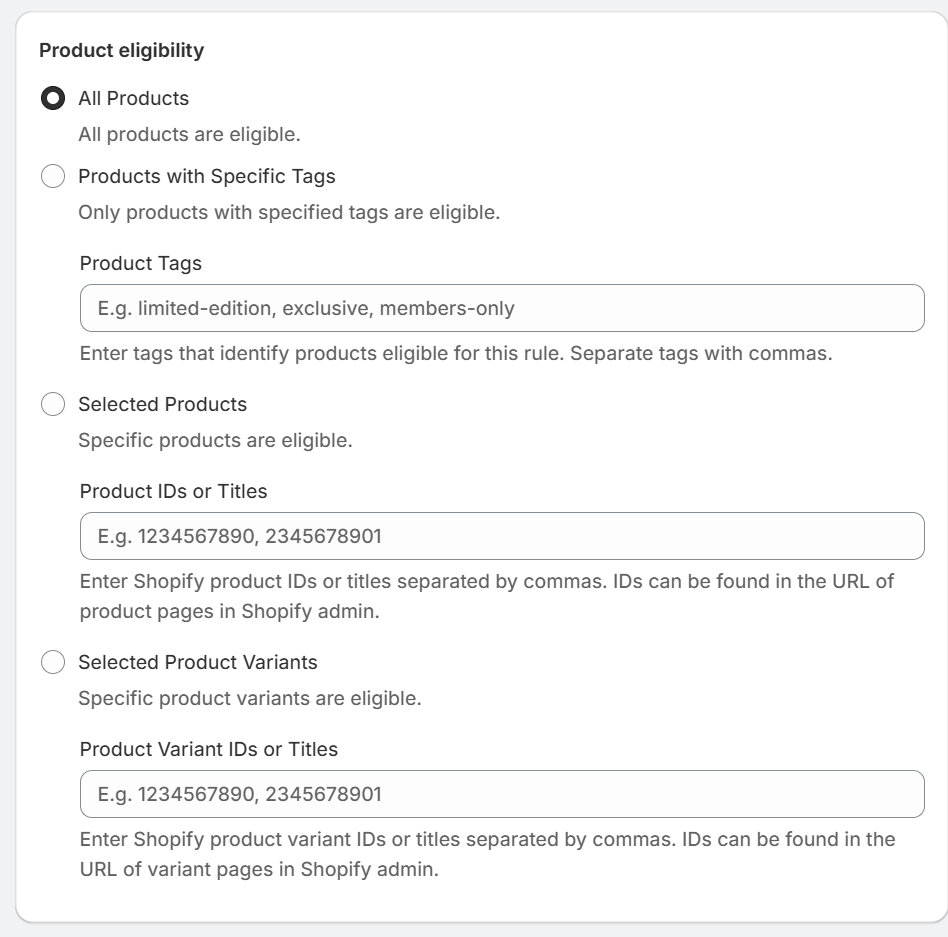
5. Define product eligibility
Select which products are affected by the rule:
- All Products: Applies the rule to every product.
- Product with specific tags: Limits apply to products tagged with specific keywords in Shopify.
- How it works: Enter one or more product tags. Any product with at least one matching tag will be subject to this limit.
- Example: Tag products with
limited-editionand enter that tag here to limit purchases of all limited-edition products. - Best for: Managing limits across product categories or collections without listing individual products.
- Selected Products: Limits apply to individually selected products with a specific title or product ID
- Product IDs: The numeric identifier found in Shopify admin URLs (e.g.,
7834521098765) - Product titles: The exact name of the product as it appears in your store (e.g.,
Limited Edition Hoodie)
- Product IDs: The numeric identifier found in Shopify admin URLs (e.g.,
Separate multiple entries with commas. You can mix IDs and titles in the same field.
- Example:
7834521098765, Summer Collection Tee, 9012345678901 - Selected product variants: Limits apply only to the variants you enter by variant ID or title.
- Finding variant IDs:
- In Shopify admin, go to Products.
- Select a product.
- Click a variant.
- The variant ID appears in the URL.
- Example:
- Limit customers to 1 purchase of the "Size XL" variant while allowing unlimited purchases of other sizes
- Restrict a specific colorway during a collaboration drop
- Cap purchases of a high-demand bundle option
- Finding variant IDs:
6. Determine customer eligibility
Choose which logged-in customers the rule affects:
- All Customers: Affects every customer.
- Customers with Specific Tags: Applies only to customers tagged with specific keywords.
- Selected Customers: Affects individually selected customers with email or domain.
- When selecting specific customers for your rule, you can use email domain patterns to target groups of customers without entering each email individually.
- How it works: Enter "@" followed by a domain to match all customers with email addresses from that domain.
| Pattern | Matches |
| @acmecorp.com | john@acmecorp.com, sales@acmecorp.com, etc. |
| @partner.org | contact@partner.org, support@partner.org, etc. |
- Common use cases:
- B2B/Wholesale accounts: Limit purchases to customers from a specific company (e.g., @bigretailer.com)
- Employee purchase programs: Restrict access to staff with company email addresses (e.g., @yourstore.com)
- Partner or affiliate access: Give special limits to partner organization members (e.g., @affiliate.org)
-
Combining patterns: You can mix full email addresses and domain patterns in the same field, separated by commas.
Example: vip@example.com, @wholesalepartner.com, buyer@bigstore.com

7. Set exclusion rules
Decide which products or customers should be excluded from this rule:
- Exclude Specific Products: Type in product IDs or names for any products you don't want this rule to apply to. Separate tags with commas.
- Exclude Customers with Tags: Enter customer tags that should not be affected by the rule. Customers with these tags can check out without restrictions. Separate tags with commas.

8. Save and activate
Click "Save" to apply the settings. Once saved, the rules are live immediately unless you set a future start date.
Once a rule is created, a summary of the rule's settings is displayed on the left side of the form for existing rules. This summary helps you review and confirm the rule's configurations before making further changes.
Using multiple limits for different product groups
You can create multiple Customer Purchase Limits to apply different limits to different product groups. Each limit tracks usage independently - a customer hitting their limit on one group doesn't affect their limit on another group.
Example scenario:
You have two product groups and want different limits for each:
- Group A: 8 products, limit 1 per customer
- Group B: 13 products, limit 2 per customer
The same customers will be buying from both groups, but you want each group tracked separately.
How to set this up
- Tag your products in Shopify:
- Add tag
group-ato your 8 Group A products - Add tag
group-bto your 13 Group B products
- Add tag
- Create the first Customer Purchase Limit:
- Set Maximum Quantity to 1
- Under Product Eligibility, choose Products with Specific Tags
- Enter the tag
group-a - Save
- Create a second Customer Purchase Limit:
- Set Maximum Quantity to 2
- Under Product Eligibility, choose Products with Specific Tags
- Enter the tag
group-b - Save
How independent tracking works
Each Customer Purchase Limit stores usage in a separate customer metafield. This means:
- A customer who buys 1 item from Group A has used their Group A limit
- They can still buy up to 2 items from Group B
- The limits don't interfere with each other
- Both limits can be active at the same time
Important notes:
- Avoid overlapping tags: Make sure products don't have tags from multiple groups. If a product has both
group-aandgroup-btags, both limits will apply to it. - Same customer eligibility: Both limits should typically use the same customer eligibility settings so the same group of customers is tracked by both rules.
- Guest handling: Consider using "Allow guest checkout" for guest customers if you want a smoother checkout experience. Limits will still be enforced when customers enter their email at checkout.
Related Articles
- Understanding Product Grouping Options — Learn how Per Product, Per Variant, and Any Item grouping affects your limits.
- Setting Up Lifetime / Once-Per-Customer Limits — Step-by-step guide for "one per customer forever" limits.
- Which Limit Type Should I Use? — Quick comparison of Order Limits vs Customer Purchase Limits.
- Resetting Customer Purchase Limits with Shopify Flow — Automate weekly, monthly, or annual resets.
- When Do Customers Need to Be Logged In? — Understand login requirements for different limit types.
- Why Customer Tag Rules Require Login — Important for tag-based customer eligibility.
- Troubleshooting: Why My Order Limits Aren't Working — Diagnose and fix common issues.
- Setting Up Price Limits — Control cart/order totals (min/max order value) for all customers.